Operating Instructions
Manual de instrucciones
Wireless Stereo
Headphone System
Sony Corporation © 1998 Printed in Japan
MDR-RF930K
3-864-070-11(1)
Setting up the
headphones
1 Open the battery compartment lid
on the left outer side of the head
band.
2 Insert two size AA (R6) batteries by
matching the ] and } on the
batteries to the ] and } in the
battery compartment.
3 Close the battery compartment lid.
Battery life
* at 1 kHz, 1 mW + 1 mW output
Notes on batteries
To avoid damage to the system caused
by battery leakage and corrosion;
– Install the batteries with the correct
polarity.
– Remove the batteries if the system is
not to be used for a long period of
time.
In case of battery leakage, wipe off any
deposit in the battery compartments
before installing new batteries.
Check the remaining power of the
headphones’ battery
Pull up the self adjusting band, and
check that the headphones’ power
indicator lights in red.
Install a new dry battery, if the power
indicator light is weak or turned off and
the sound become distorted or has a lot
of noise.
( Operating the system
Listening to a
program
1 Select the radio frequency with the
CHANNEL selector switch.
2 Turn on the audio/video equipment.
3 Put on the headphones and the
power turns on automatically.
4 Turn up the volume to a moderate
level with the VOL control, then
tune the headphones to the
transmitte frequency with the
TUNING control until you can hear
the audio signal loud and clear.
1
2
Try the above steps 1 and 4 until the
receiving performance becomes better.
Sending RF signals from the Transmitter
The transmitter starts sending the RF
signals automatically, when it detects
audio signals from the equipments
connected.
If it does not detect an audio signal for
more than approximately five minutes,
the transmitter will stop sending RF
signals.
But the Power indicator remains lighting
as long as the AC power adaptor is
connected. When the transmitter
receives an audio signal again, it starts
sending the RF signals.
If the audio signal is very weak, the
transmitter does not send RF signals
automatically. In this case, make sure
the volume of the equipments connected
is set to 5 – 6.
You may not hear the beginning of the
sound from the headphones until the
transmitter starts sending the RF signals
after detecting an audio signal.
Note
If the transmitter is connected to the headphones
jack of the source equipment, set the volume of
that equipment as high as possible without
distorting the audio signal.
Auto power on/off function
When you remove the headphones, the
power turns off automatically. Do not
allow the self adjusting band to be
pulled up, otherwise the headphones
will be switched on.
The power turns on. The power turns off.
Mute function
If a hissing noise is heard when the
headphones are used outside of the
effective range (see the next section), the
mute function will be activated and the
sound will not be heard from the
headphones. To restore the sound,
move near toward the transmitter.
After listening to a program
Take the headphones off before turning
off the transmitter. If you turn off the
transmitter first, you may hear some
noise.
The effective areas
of the transmitter
The optimum distance is up to
approximately 150 feet (46 m) without
the system picking up some interference.
However, the distance may vary
according to the surroundings and
environment. If the system picks up
some noise while using it within the
above mentioned distance, reduce the
distance between the transmitter unit
and the headphones, or select the other
channel.
Notes
• When you use the headphones inside the effective areas
of the transmitter, the transmitter can be placed in any
direction from the listener.
• Even within the signal reception area, there are some
spots (dead spot) where the RF signal can not be
received. This characteristics is inherent to RF signals,
and does not indicate malfunction. By slightly moving
the transmitter, location of the dead spot can be
changed.
Replacing the ear pads
When the ear pads become dirty or
damaged, you can get replacements
from your Sony dealer. Replace them as
illustrated below.
1 Remove the old ear pad by pulling it
out of the groove on the housing.
2 Place the new ear pad on the driver
unit and insert the edge of the pad
into the groove as illustrated.
Make sure that the entire edge of the ear
pad is securely inserted into the groove.
( Additional information
Precautions
• When the headphones are not to be
used for a long period of time, remove
the batteries to avoid damage caused
by battery leakage and subsequent
corrosion.
• When the transmitter is not to be used
for a long period of time, disconnect
the AC power adaptor from the AC
outlet holding the plug. Do not pull
on the cord.
Also remove the batteries to avoid
damage caused by battery leakage and
subsequent corrosion.
• Do not leave the wireless stereo
headphone system in a location subject
to direct sunlight, heat or moisture.
Notes on headphones
Preventing hearing damage
Avoid using headphones at high
volume. Hearing experts advise against
continuous, loud and extended play. If
you experience a ringing in your ears,
reduce the volume or discontinue use.
Caring for others
Keep the volume at a moderate level.
This will allow you to hear outside
sounds and to be considerate to the
people around you.
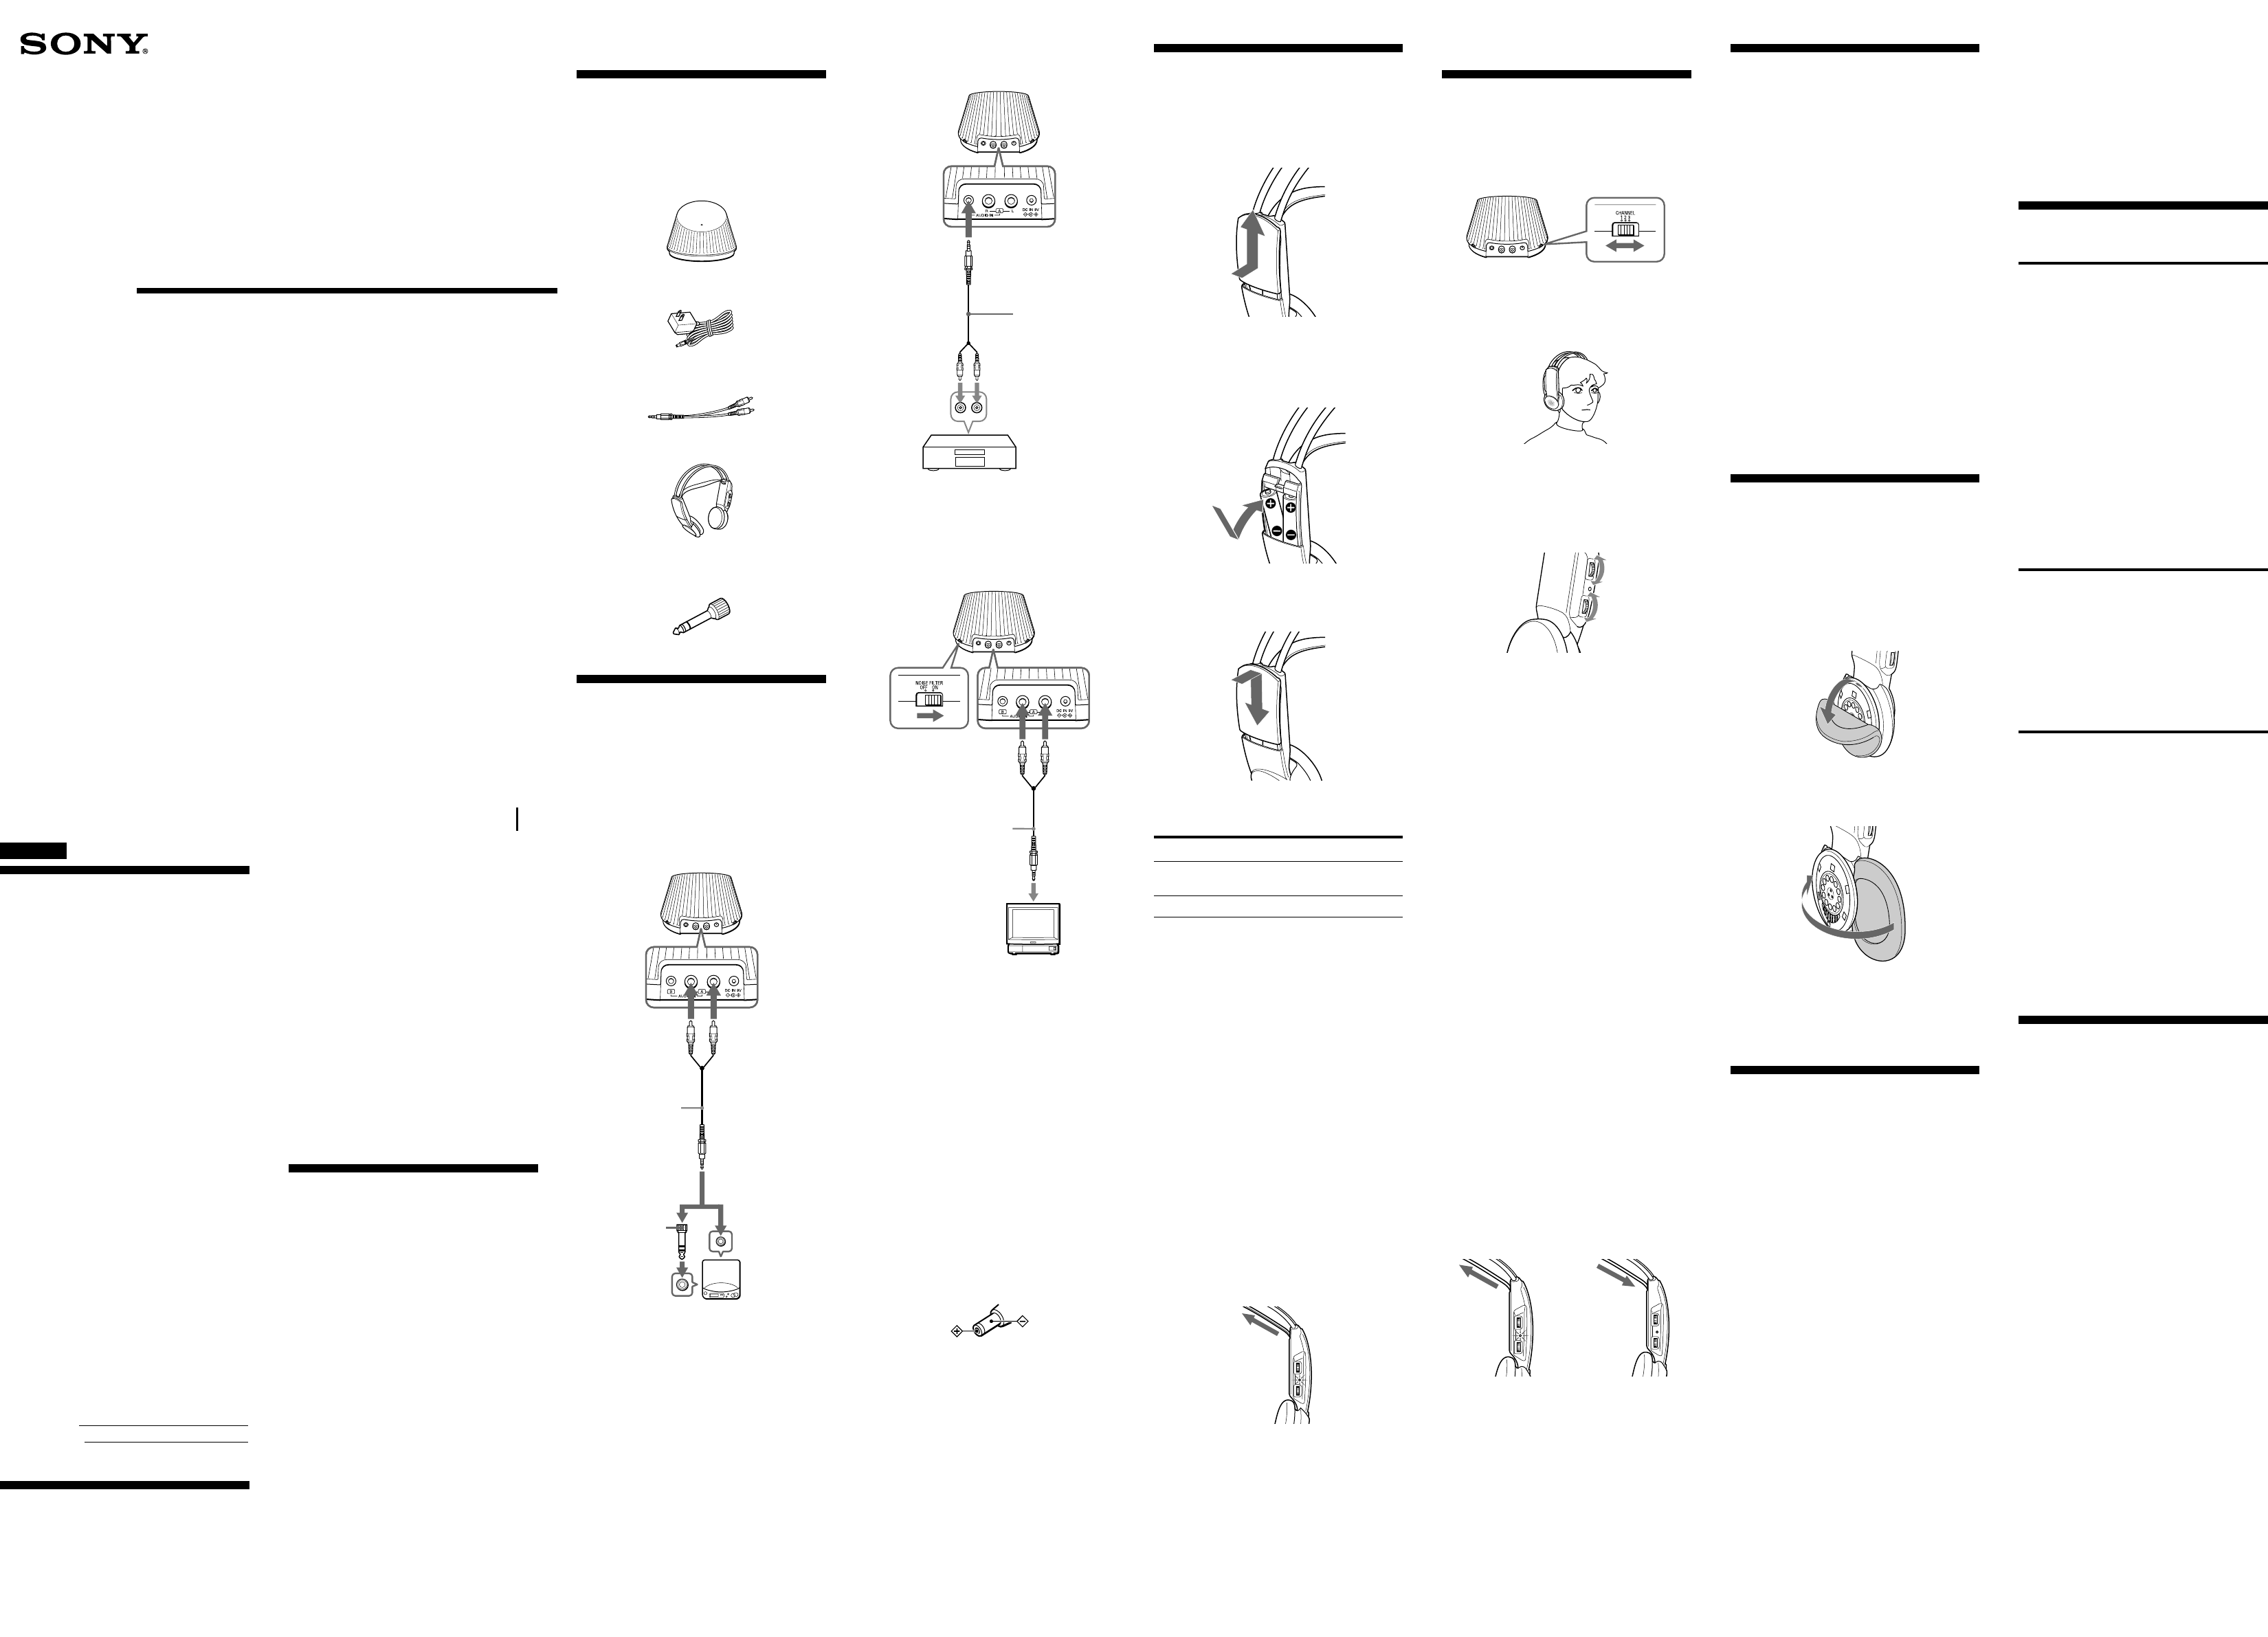
b To connect to LINE OUT or REC OUT
jacks
c To connect to TV, etc.
If noise occurs when the transmitter is
connected to the headphone jack of
your TV or VCR, set the NOISE
FILTER switch to ON.
Notes
•If you connect the transmitter to LINE OUT
or REC OUT jack, do not set the NOISE
FILTER switch to ON. Otherwise, the
volume will be limited.
•The NOISE FILTER switch effects the sound
only in cases such as connection diagram c.
In diagrams a and b, the switch has no
effect.
•When the transmitter is placed on or near a
TV, it may pick up a noise. In such case,
place the transmitter away from the TV.
2 Connect the transmitter to an AC
outlet using the supplied AC power
adaptor.
If you connect the AC power
adaptor, power of the transmitter
will be turned on.
Notes
• Use only the supplied AC power adaptor. Do not use
any other AC power adaptor.
Polarity of the plug
• When you connect the connecting cord directly to an
earphone jack, the audio signal will not be output
through the right channel. In such a case, use the
separately sold PC-236HG plug adaptor.
• If the connected equipment has the AVLS (Automatic
Volume Limiter System) function, be sure to turn the
function off when using the transmitter. Otherwise, you
will have to turn up the volume of the headphones, and
that may cause noise.
• Do not place the transmitter near a fluorescent lamp, etc.
when using the system.
* WALKMAN is a registered trademark of Sony
Corporation.
( Getting started
Unpacking
Check that you have the following
items:
• The transmitter
• AC power adaptor
• Connecting cord (phono plugs ˜
stereo mini plug), 1 m
• The headphones
• Unimatch plug adaptor (stereo mini
jack n stereo phone plug)
Setting up the
transmitter
1 Connect the transmitter to audio/
video equipment. Select one of the
hookups below depending on the
jack type:
a To connect to a headphones jack
reference.
Some features are:
• Wireless system that allows you to
listen to a program free from the
restriction of a cord within 150 feet
(46 m) from the transmitter.
• High fidelity sound reproduction
• Compact transmitter which operates
on AC power using the supplied AC
power adaptor
• Comfortable Supra-aural headphones
with the self adjusting head band
• Automatic ON/OFF function on
headphones to preserve battery power
• Mute function to avoid noise when no
audio signal is available.
Notes on receiving
performance
The system for this equipment utilizes very
high frequency signals in the 900 MHz band
so the receiving performance may deteriorate
due to the surroundings. The following
examples illustrate conditions that may
reduce the possible receiving range or cause
interference with reception.
• Inside a building with walls containing
steel beams.
• Area with many steel file cabinets, etc.
• Area with many electrical appliances
capable of generating electromagnetic
noise.
• Transmitter is placed on a metal
instrument.
• Area facing roadways.
• Noise or interfering signals exist in the
surroundings due to radio transceivers in
trucks, etc.
• Noise or interfering signals exist in the
surroundings due to wireless
communication systems installed along
roadways.
English
WARNING
To prevent fire or shock hazard,
do not expose the unit to rain or
moisture.
To avoid electrical shock, do not
open the cabinet. Refer servicing
to qualified personnel only.
WARNING
You are cautioned that any changes or
modifications not expressly approved in
this manual could void your authority to
operate this equipment.
Owner’s Record
The model number is located at the
bottom of the transmitter and the inner
side of the self adjusting band.
The serial number is located at the
bottom of the transmitter and inside of
the battery compartment of the
headphones.
Record these numbers in the spaces
provided below. Refer to them
whenever you call upon your Sony
dealer regarding this product.
Model No. MDR-RF930K
Transmitter TMR-RF930
Headphones MDR-RF930
Serial No.
Transmitter
Headphones
Welcome!
Thank you for purchasing the Sony
MDR-RF930K Wireless Stereo
Headphone System. Before operating
the unit, please read this manual
thoroughly and retain it for future
Transmitter
Left channel
(white)
Right channel
(red)
Unimatch plug
adaptor
(supplied)
Discman, MD,
WALKMAN*,
VCR, etc.
to headphones
jack (stereo
mini jack)
Connecting cord
(supplied)
to AUDIO
IN A jacks
to headphones
jack (stereo
phone jack)
TV, etc.
to stereo mini jack
Transmitter
to AUDIO
IN A jack
Left channel
(white)
Right
channel
(red)
Connecting
cord (supplied)
to AUDIO
IN B jack
Connecting cord
(supplied)
Right channel
(red)
Left
channel
(white)
to LINE OUT or
REC OUT jacks
Stereo system,
VCR, etc.
Transmitter
Battery
Sony alkaline battery
SG (LR6)
Sony battery SR (R6P)
Approx. hours*
60
30
Transmitter
If you have any questions or problems
concerning the system that are not
covered in this manual, please consult
the nearest Sony dealer.
Be sure to bring the headphones and the
transmitter to the Sony dealer when
requiring repair work.
Troubleshooting
No sound/Muffled sound
/ Turn on the transmitter first, then put on the
headphones.
/ Check the connection of the audio/video
equipment or the AC power adaptor.
/ Check that the audio/video equipment is
turned on.
/ Turn up the volume on the connected audio/
video equipment, if the transmitter is
connected to the headphones jack.
/ Select the radio frequency with the CHANNEL
selector, then tune the headphones in the
frequency of the transmitter with the TUNING
control.
/ The mute function is activated.
Use the headphones near the transmitter.
/ Replace both batteries of headphones.
/
If you connect the transmitter to LINE OUT or
REC OUT jack of an audio reproducer, make
sure that the NOISE FILTER switch is set to OFF.
Distortion
/ If the transmitter is connected to the
headphones jack, turn down the volume of the
connected audio/video equipment.
/ Select the radio frequency with the CHANNEL
selector.
/ Replace both batteries of headphones.
/
If you connect the transmitter to LINE OUT or
REC OUT jack of an audio reproducer, make
sure that the NOISE FILTER switch is set to OFF.
Loud background noise
/ Move closer to the transmitter. As you move
away from the transmitter, more noise is likely
to be heard.
/ If the transmitter is connected to the
headphones jack, turn up the volume of the
connected audio/video equipment.
/ Select the radio frequency with the CHANNEL
selector, then tune in the frequency of the
transmitter with the TUNING control.
/ If noise is heard when the transmitter is
hooked to the TV headphones jack, try
connecting from LINE OUT.
/ Replace both batteries of headphones.
/
If you connect the transmitter to LINE OUT or
REC OUT jack of an audio reproducer, make
sure that the NOISE FILTER switch is set to OFF.
Specifications
General
Carrier frequency
913.0 – 915.0 MHz
Channel Ch1, Ch2, Ch3
Modulation FM stereo
Frequency response
20 – 20,000 Hz
Transmitter
RF power Less than 94 dBµV/m at 3 m
Power source DC 9 V: supplied AC power
adaptor
Audio input phono jacks/stereo mini jack
Dimensions Approx. 120 mm dia × 87 mm
(4
3
/4 × 3
1
/2 in.) (w/h)
Mass Approx. 125 g (4.4 oz.)
Headphones
Power source DC 3 V: 2 × size AA (R6) battery
Mass Approx. 215 g (7.6 oz.) incl.
batteries
Optional accessories
Plug adaptor PC-236HG (stereo mini jack ˜
monaural mini plug)
Design and specifications are subject to change
without notice.
TUNING
control
VOL control


 (88 pages)

 (1 pages)

 (2 pages)

 (2 pages)
 Manymanuals.com
 Manymanuals.de
 Manymanuals.fr
 Manymanuals.it
 Manymanuals.pl
 Manymanuals.cz
 Manymanuals.es
 Manymanuals-pt.com
Comments to this Manuals