スポーツパック準備ガイド
Sports Pack Preparation Guide
Guide de préparation du caisson sport
4-419-631-01(1)
SPK-HCH
4
1
5
© 2012 Sony Corporation Printed in Japan
準備
ご注意
以下で説明されるデジタル
HD
ビデオカメラレコーダーおよびデジタルビデオカメ
ラレコーダー(以下カメラとする)はすべての国/地域で取り扱いしているわけでは
ありません。
スポーツパックの準備
1
リア部を開いてスペーサー
をはずす。
2
O
リング、溝および本体との接触面の砂やゴミなどをきれいに取り除き、
O
リングに薄く均一にグリスを塗る。
砂やゴミが付着したままふたを閉めると、傷が付いて浸水の原因になります。
O
リングの取り扱いかたについて、詳しくは、取扱説明書の「
O
リングの取り扱い
かた」をご覧ください。
3
リア部を閉め、バックルを閉じる。
4
グリップベルトを調節する。
START/STOP
ボタン、テレボタン、ワイドボタン、
PHOTO
ボタンを操作できるよ
うに位置を決め、グリップベルトを調整してください。
5
ショルダーベルトを取り付ける。
台座の準備
1
本機を開ける。
ロック解除ボタンを矢印の方向にずらしたまま、オープンスライダー を
ずらしてバックルを開ける。
リア部を開く。
2
台座から音声/リモートプラグ
をはずす。
3
本機に取り付いている台座をはずす。
矢印の方向に台座の片側のノブを押さえるようにしてつかみロックをはずし、台
座をゆっくりと引き出します。
製品出荷時は、台座
M
が本機に取り付けてあります。
4
下の表から、お手持ちのカメラに合う台座、番号を選ぶ。
台座 番号 カメラ
F-2
1 HDR-CX12/CX11/CX7/CX6
2
HDR-PJ600V/PJ600/PJ590V/PJ580V/PJ580/
PJ260V/PJ260/PJ50V/PJ50/PJ40V/PJ30V/PJ30/
PJ20/PJ10,
HDR-XR260V/XR260/XR160,
HDR-SR8/SR7/SR5
3 HDR-CX700V/CX700/CX690/CX560V/CX560
H 1
HDR-CX590V/CX580V/CX580/CX570/CX360V/
CX360,
HDR-XR520V/XR520/XR500V/XR500/XR200V/
XR200/XR106/XR105/XR101/XR100,
HDR-SR12/SR11/SR10,
DCR-SR220/SR210
I-2
1
HDR-CX520V/CX520/CX505V/CX500V/CX500,
DCR-SR88/SR85/S
R78/SR75/SR68/SR65/SR58/
S
R55/SR46/SR45/SR36/SR35
2
HDR-XR350V/XR350
L
1
HDR-CX550V/CX550,
HDR-XR550V/XR550
2
HDR-XR155/XR150
M 1
HDR-PJ760V/PJ760/PJ740V/PJ720/PJ710V/PJ710,
HDR-CX760V/CX760/CX740V/CX730/CX720V
5
台座
M
以外をご使用の場合は、台座
M
から三脚ネジプレート
をはずし、
手順
4
で選択した台座の番号にあわせて、三脚ネジプレートをパチンと音
がするまで押し込み取り付ける。
お買い上げ時、三脚ネジプレートは台座
M
に取り付けてあります。台座
M
をご使
用の場合、この手順は必要ありません。
ビデオカメラの準備
カメラの取扱説明書もあわせてご覧ください。
1
付属品をはずす。
MC
プロテクター、
ND
フィルター、コンバージョンレンズ、特殊フィルター、レン
ズキャップ、レンズフード、ショルダーストラップなどを取りはずしてください。
手動レンズシャッターが付いているカメラをご使用のときは、レンズシャッター
を開けてください。
2
バッテリーを取り付ける。
充分に充電してあるバッテリーを取り付けてください。
3
メディアを入れる。
お使いのカメラに対応したメモリーカード(“メモリースティック
デュオ”、
SD
カード)の種類については、カメラの取扱説明書をご確認ください。
ご注意
誤消去防止つまみ、ス
イッチを解除し、記
録できるようにしてください。
メモリーカード、ハードディスクおよび内蔵メモリーの残量を確認しておいてく
ださい。
4
反射防止リング(イラスト
-3-
)をカメラのフィルター取り付けねじ
に取り付ける。
反射防止リングは、外光がスポーツパック(以下本機とする)内で反射してレンズ
に入るのを防ぎます。
反射防止リング種類 カメラ
反射防止リング(M
30
×φ
47
)
HDR-CX360V/CX360,
HDR-XR155/XR150
反射防止リング
(M30
×φ
50) DCR-SR88/SR78/SR68/SR58
反射防止リング
(M30
×φ
58)
HDR-PJ600V/PJ600/PJ590V/PJ580V/PJ580,
HDR-CX590V/CX580V/CX580/CX570,
HDR-XR350V/XR350,
DCR-SR85/SR75/SR65/SR55/SR46/SR45/
SR36/SR35
反射防止リング(
M30
×φ
62
)
HDR-PJ50V/PJ50/PJ40V/PJ30V/PJ30,
HDR-XR200V/XR200/XR106/XR105/XR101/
XR100,
HDR-SR10,
DCR-SR220/SR210
反射防止リング(
M37
×φ
49
)
HDR-CX700V/CX700/CX690/CX560V/
CX560
反射防止リング(
M37
×φ
55
)
HDR-PJ260V/PJ260/PJ20/PJ10,
HDR-CX550V/CX550/CX520V/CX520/
CX505V/CX500V/CX500/CX12/CX11/CX7/
CX6,
HDR-XR550V/XR550/XR520V/XR520/
XR500V/XR500/XR260V/XR260/XR160,
HDR-SR12/SR11/SR8/SR7/SR5
反射防止リング(
M52
×φ
58
)
HDR-PJ760V/PJ760/PJ740V/PJ720/PJ710V/
PJ710,
HDR-CX760V/CX760/CX740V/CX730/
CX720V
5
液晶画面を外側に向けて本体に閉じる。
6
フォーカス、明るさなどの調節が手動になっているときは、自動に戻す。
7
HDR-PJ760V/PJ760/PJ740V/PJ720/PJ710V/PJ710
、
HDR-CX760V/
CX760/CX740V/CX730/CX720V
で手ブレ補正機能をお使いの場合
は、手ブレ補正機能をアクティブモードにしてお使いください。
ビデオカメラを取り付ける
電源スイッチがあるカメラでは、電源スイッチを「
OFF
」にし、本機の電源も切ってお
いてください。液晶画面の開閉で電源を「
ON/OFF
」するカメラでは、カメラの電源
を「
OFF
」にする必要はありません。
ご注意
カメラ取り付け後は、本機の
POWER
ボタンを押してカメラの電源も「
ON/OFF
」で
ˎ
きます。
1
台座に取り付ける。
カメラ底面の三脚用ネジ穴に台座のネジ位置を合わせる。
付属のショルダーベルトの金具(イラスト
-5-
)を使って台座のネジをし
め、台座へ取り付ける。
2
乾燥剤を取り付ける。
付属の乾燥剤を取り付けてください。詳しくは、取扱説明書の「乾燥剤について」
をご覧ください。
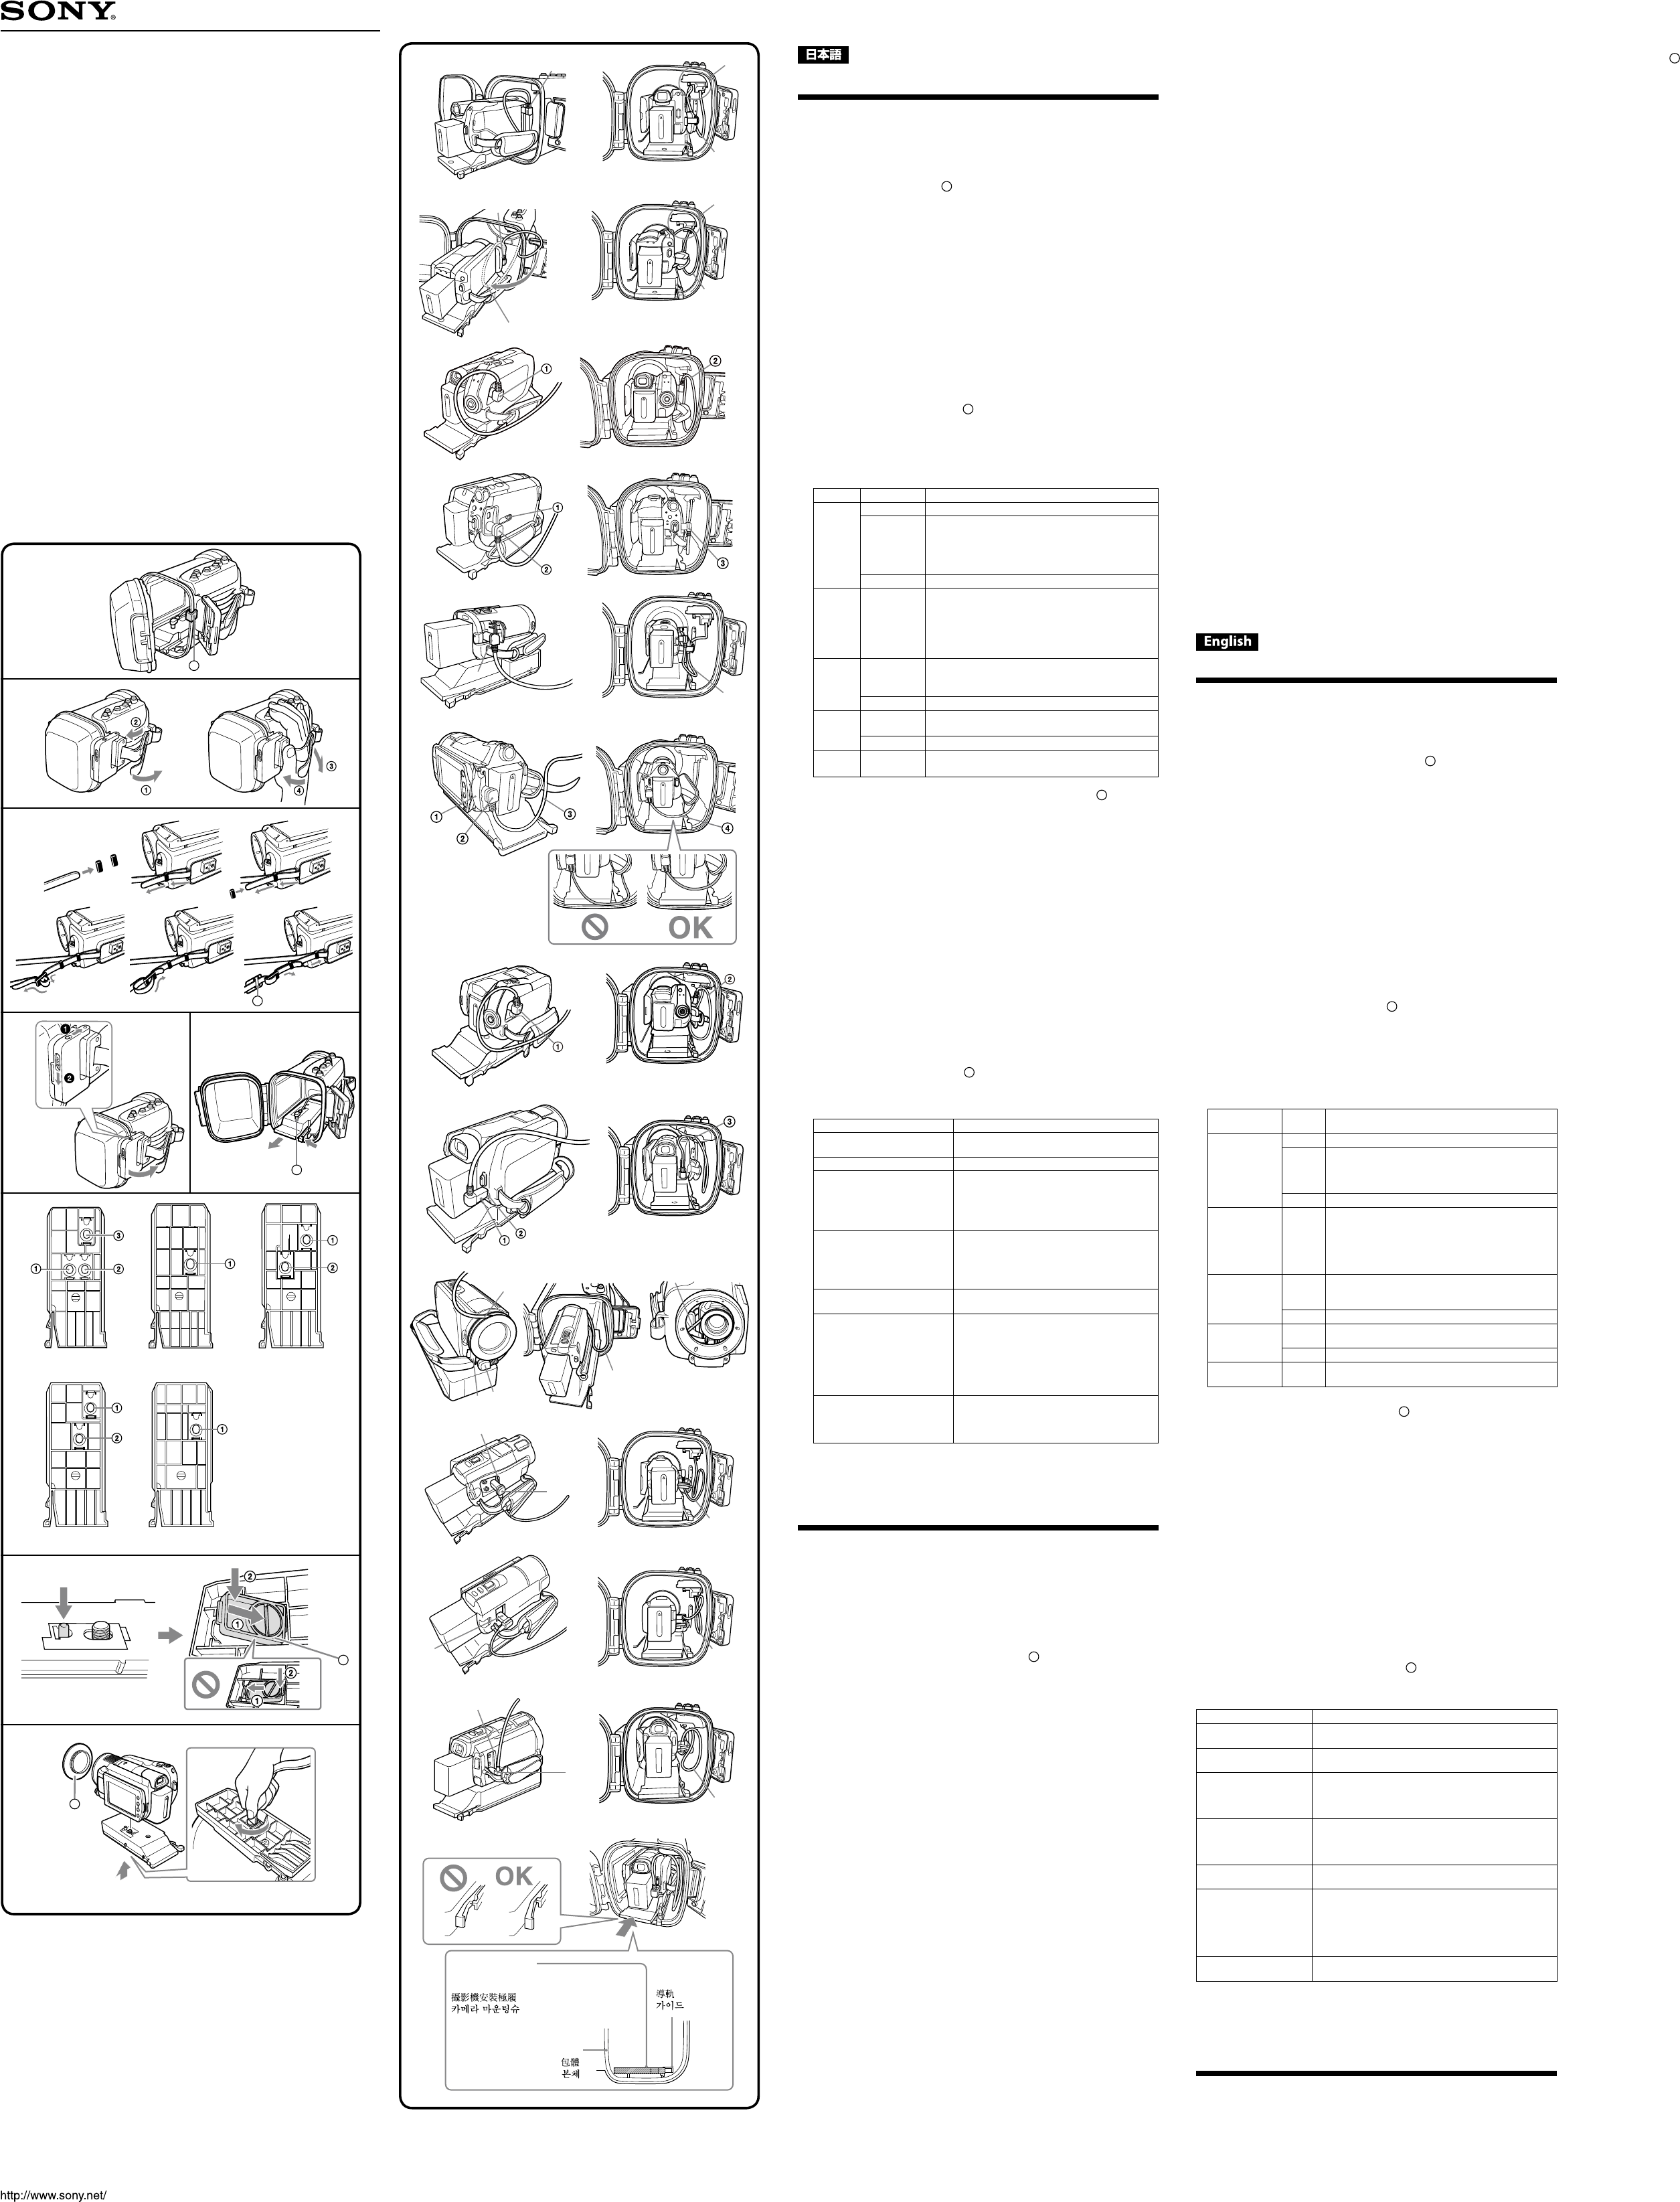
3
カメラにプラグを接続し、本機に取り付ける。
お手持ちのカメラに合わせて、音声
/
リモートプラグを
A/V
端子、
A/V OUT
端子ま
たは
A/V
リモート端子へ奥までしっかり差し込みます。
本機への取り付けは、台座を本機のフロント部内のガイドに合わせ、台座の後部
を押して、カチッとロックされるまで差し込みます。
ご注意
本機を立てた状態で台座を差し込まないでください。
ˎ
台座やフロント部を傷める原因になります。
ケーブルがレンズ、液晶、ビューファインダー、ズームレバーおよびフォトボタ
ˎ
ンにかからないようにしてください。
液晶画面の開閉で電源を「
ON/OFF
」するカメラでは、静止画撮影モードや画像
ˎ
再生モードのときに音声
/
リモートプラグを接続すると動画撮影モードへ切り
替わります。
HDR-XR520V/XR520/XR500V/XR500
をお使いの場合(イラスト
-4-A
)
端子カバーを開け、プラグを取り付ける(図のように、プラグから出たケーブル
がカメラの後ろ側へ円を描くようにする)。
ケーブルが本機内側の部品に引っかからないよう注意しながら本機に取り付
ける。
本機に取り付けた後、ケーブルをカメラのグリップベルト側に軽く押し込んで
整理する。
HDR-XR200V/XR200/XR106/XR105/XR101/XR100
をお使いの場合(イラス
ト
-4-B
)
端子カバーを開け、プラグを取り付ける。
図のように、プラグから出たケーブルがカメラの後ろ側へ円を描くようにする。
ケーブルが本機内側の部品に引っかからないよう注意しながら本機に取り付
ける。
本機に取り付けた後、ケーブルをカメラのグリップベルト側に軽く押し込んで
整理する。
HDR-SR12/SR11/SR10
、
DCR-SR220/SR210
をお使いの場合(イラスト
-4-C
)
端子カバーを開け、プラグを取り付ける(図のように、プラグから出たケーブル
がカメラの後ろ側へ円を描くようにする)。
本機に取り付けた後、ケーブルをカメラのグリップベルト側に軽く押し込んで
整理する。
HDR-PJ600V/PJ600/PJ50V/PJ50
、
HDR-XR260V/XR260/XR160
、
HDR-SR8/
SR7/SR5
をお使いの場合(イラスト
-4-D
)
端子カバーを開ける。
プラグを取り付ける。
本機に取り付けた後、ケーブルをカメラのグリップベルト側に整理する。
HDR-XR350V/XR350/XR155/XR150
をお使いの場合(イラスト
-4-E
)
端子カバーを開け、プラグを取り付ける。
本機に取り付けた後、ケーブルが台座の手前などに引っかからないように注意
しながらカメラのグリップベルト側に整理する。
HDR-CX12/CX11/CX7/CX6
をお使いの場合(イラスト
-4-F
)
端子カバーを開ける。
プラグを取り付ける。
ケーブルを台座の上に乗せて、本機に取り付ける。
本機に取り付けた後、ケーブルを台座から外へ落ちないように置き、カメラの
グリップベルト側に整理する。
HDR-CX520V/CX520/CX505V/CX500V/CX500
、
DCR-SR85/SR75/SR65/
SR55/SR46/SR45/SR36/SR35
をお使いの場合(イラスト
-4-G
)
端子カバーを開け、プラグを取り付ける(図のように、プラグから出たケーブル
がカメラの後ろ側へ円を描くようにする)。
本機に取り付けた後、ケーブルをカメラのグリップベルト側に軽く押し込んで
整理する。
HDR-CX550V/CX550/XR550V/XR550
をお使いの場合(イラスト
-4-H
)
端子カバーを開ける。
プラグを取り付ける。
本機に取り付けた後、ケーブルを整理する(本機のケーブル保持部にかける)。
DCR-SR88/SR78/SR68/SR58
をお使いの場合
(
イラスト
-4-I)
端子カバーを開ける。
プラグを取り付ける。
ケーブルを反射防止リングの溝へ図のようにはさむ。
ケーブルを図のようにして、台座を本機に取り付ける。
取り付ける際は次のことに注意する:
ケーブルが折れ曲がっていないか
ˎ
ケーブルが反射防止リングの溝からはずれていないか
ˎ
本機に取り付けた後、ケーブルがカメラのレンズにかかっていないかを確認す
る。
HDR-CX700V/CX700/CX690/CX560V/CX560
をお使いの場合
(
イラスト
-4-J)
端子カバーを開ける。
カメラのグリップベルトの下を通して、プラグを取り付ける。
本機に取り付けた後、ケーブルをカメラのグリップベルト側に整理する。
HDR-PJ590V/PJ580V/PJ580/PJ260V/PJ260/PJ40V/PJ30V/PJ30/PJ20/
PJ10
、
HDR-CX590V/CX580V/CX580/CX570/CX360V/CX360
をお使いの場
合(イラスト
-4-K
)
端子カバーを開け、プラグを取り付ける。
本機に取り付けた後、ケーブルをカメラのグリップベルト側に整理する。
HDR-PJ760V/PJ760/PJ740V/PJ720/PJ710V/PJ710
、
HDR-CX760V/CX760/
CX740V/CX730/CX720V
をお使いの場合(イラスト
-4-L
)
端子カバーを開ける
図のように上側からプラグを取り付ける。
本機に取り付けた後、ケーブルをカメラのグリップベルト側に整理する。
5
リア部を閉じる
リア部をしっかり押さえ、バックルがカチッとロックされるまで締めます。
ご注意
ケーブルを挟み込まないようにご注意ください。
ˎ
カメラを本機に収納したとき、レンズの中心が本機のフロントガラス部中心に
ˎ
対してずれているものもありますが、撮影などに問題ありません。
Preparing
Notes
e models of Sony digital HD video camera recorders and digital video camera recorders
(referred to below as “
camera
”) described below may not be available in all countries/
regions.
Preparing the Sports pack
1 Open the rear body and remove the spacer
.
2 Remove foreign materials such as dust, sand or hair from the O-ring,
groove and any surface the camera touches, and then apply the
grease evenly to the O-ring.
If the body is closed with such materials present, those areas may be damaged and
water may leak in.
For details on handling the O-ring, refer to “Handling the O-ring” in the operating
instructions.
3 Close the rear body and then fasten the buckles.
4 Adjust the grip belt.
Adjust the length of the grip strap while holding this unit so that your ngertips can
easily reach the START/STOP button, Telephoto button, Wide button and PHOTO
button.
5 Attach the shoulder strap.
Selecting the Camera Mounting Shoe
1 Open the sports pack.
Slide the unlock button
in the direction of the arrow and hold it, then slide the
open slider
and release the buckle.
Open the rear body.
2 Disconnect the Audio/Remote plug
from the camera mounting
shoe.
3 Remove the camera mounting shoe attached to this unit.
Keep pressing the knob on one side of the camera mounting shoe in the direction of
the arrow to release the lock, and slide the camera mounting shoe o slowly.
Camera mounting shoe M is attached to this unit when this unit is shipped from the
factory.
4 Choose the camera mounting shoe and the number according to the
table below.
Camera
mounting shoe
Number Camera
F-2
1 HDR-CX12/CX11/CX7/CX6
2
HDR-PJ600V/PJ600/PJ590V/PJ580V/PJ580/PJ260V/
PJ260/PJ50V/PJ50/PJ40V/PJ30V/PJ30/PJ20/PJ10,
HDR-XR260V/XR260/XR160,
HDR-SR8/SR7/SR5
3 HDR-CX700V/CX700/CX690/CX560V/CX560
H 1
HDR-CX590V/CX580V/CX580/CX570/CX360V/
CX360,
HDR-XR520V/XR520/XR500V/XR500/XR200V/
XR200/XR106/XR105/XR101/XR100,
HDR-SR12/SR11/SR10,
DCR-SR220/SR210
I-2
1
HDR-CX520V/CX520/CX505V/CX500V/CX500,
DCR-SR88/SR85/SR78/SR75/SR68/SR65/SR58/SR55/
SR46/SR45/SR36/SR35
2 HDR-XR350V/XR350
L
1
HDR-CX550V/CX550,
HDR-XR550V/XR550
2 HDR-XR155/XR150
M 1
HDR-PJ760V/PJ760/PJ740V/PJ720/PJ710V/PJ710,
HDR-CX760V/CX760/CX740V/CX730/CX720V
5 When using a camera mounting shoe other than camera mounting
shoe M, detach the tripod screw plate
from camera mounting shoe
M. Then align the tripod screw plate with the correct number on the
chosen camera mounting shoe, and press until it clicks into place.
e tripod screw plate is attached to camera mounting shoe M when this unit is
shipped from the factory. If you use camera mounting shoe M, this step is not required.
Preparing the Video Camera
For details, refer also to the operating instructions supplied with the camera.
1 Detach the accessory.
Remove the lter, conversion lens, lens cap, lens hood or the shoulder strap from the
camera.
When using a camera with a manual lens shutter, open the lens shutter.
2 Install the battery pack.
Attach a fully recharged battery pack.
3 Insert the media.
For the kinds of memory card (“Memory Stick Duo” media, SD card) compatible with
your camera, refer to the camera’s operating instructions.
Notes
Unlock the write-protect tab on the memory card and the cassette tape to enable them to
record images.
Make sure that the memory card, hard disk and internal memory have enough space to
record images.
4 Attach the reex prevention ring (
-3-
) to the lter attachment
screw of the camera.
e reex prevention ring prevents external light from being reected inside the sports
pack (referred to below as “
this unit
”) and entering the lens.
Reex prevention ring Camera
Reex prevention ring
(M30 × ø 47)
HDR-CX360V/CX360,
HDR-XR155/XR150
Reex prevention ring
(M30 × ø 50)
DCR-SR88/SR78/SR68/SR58
Reex prevention ring
(M30 × ø 58)
HDR-PJ600V/PJ600/PJ590V/PJ580V/PJ580,
HDR-CX590V/CX580V/CX580/CX570,
HDR-XR350V/XR350,
DCR-SR85/SR75/SR65/SR55/SR46/SR45/SR36/SR35
Reex prevention ring
(M30 × ø 62)
HDR-PJ50V/PJ50/PJ40V/PJ30V/PJ30,
HDR-XR200V/XR200/XR106/XR105/XR101/XR100,
HDR-SR10,
DCR-SR220/SR210
Reex prevention ring
(M37 × ø 49)
HDR-CX700V/CX700/CX690/CX560V/CX560
Reex prevention ring
(M37 × ø 55)
HDR-PJ260V/PJ260/PJ20/PJ10,
HDR-CX550V/CX550/CX520V/CX520/CX505V/CX500V/
CX500/CX12/CX11/CX7/CX6,
HDR-XR550V/XR550/XR520V/XR520/XR500V/XR500/
XR260V/XR260/XR160,
HDR-SR12/SR11/SR8/SR7/SR5
Reex prevention ring
(M52 × ø 58)
HDR-PJ760V/PJ760/PJ740V/PJ720/PJ710V/PJ710,
HDR-CX760V/CX760/CX740V/CX730/CX720V
5 Turn the LCD panel around so that it faces outwards and place it back
in the camera.
6 Set functions such as focusing and lightning, to AUTO.
7 When using the SteadyShot function of the HDR-PJ760V/PJ760/
PJ740V/PJ720/PJ710V/PJ710 or HDR-CX760V/CX760/CX740V/CX730/
CX720V, set the SteadyShot function to Active mode.
Installing the Video Camera
When using a camera with a POWER switch, turn the POWER switch o. Also leave the
power of this unit turned o. When using a camera with an internal power switch linked
to the switching action of the LCD screen, you do not need to turn o the camera.
Notes
Aer installing the camera into this unit, you can turn the power of the camera on and
ˎ
o by pressing the POWER button of this unit.
1 Attach the camera mounting shoe.
Align the screw position of the camera mounting shoe with the tripod screw on the
bottom of the camera.
3
H
G
F
B
C
D
Attach the camera mounting shoe to the camera using the metal parts of shoulder
strap (
-5-
) as illustrated.
2 Attach the desiccant.
Attach the desiccant supplied. For details, refer to “Desiccant” in the supplied operating
instructions.
3 Connect the plug to the camera and install the camera into this unit.
Depending on your camera, rmly insert the Audio/Remote plug into the A/V jack,
A/V OUT jack or A/V remote jack.
When installing the camera into this unit, align the camera mounting shoe with the
guide inside the front body of this unit, and then push the rear of the camera mounting
shoe until it clicks into place.
Notes
Be sure to keep this unit horizontal when installing the camera mounting shoe.
ˎ
Installing the camera mounting shoe in a vertical motion may damage the camera
mounting shoe and the front body.
Be sure not to cover the lens, LCD screen, view nder, zoom lever or PHOTO button
ˎ
with the cable.
When using a camera with an internal power switch linked to the switching action
ˎ
of the LCD screen, connecting the Audio/Remote plug will switch the Still image
recording mode/Video playing mode of the camera to Movie recording mode.
When using HDR-XR520V/XR520/XR500V/XR500 (See illustration
-4-A)
Open the jack cover and connect the plug. (Arrange the cable connected to this unit
in a loop towards the rear of the plug, as illustrated.)
Install the camera into this unit, taking care not to catch the cable on the parts
inside this unit.
Aer installing the camera into this unit, arrange the cable on the grip belt side of
the camera.
When using HDR-XR200V/XR200/XR106/XR105/XR101/XR100 (See illustration
-4-B)
Open the jack cover and connect the plug.
Arrange the cable connected to this unit in a loop towards the rear of the plug, as
illustrated.
Install the camera into this unit, taking care not to catch the cable on the parts
inside this unit.
Aer installing the camera into this unit, arrange the cable on the grip belt side of
the camera.
When using HDR-SR12/SR11/SR10, DCR-SR220/SR210 (See illustration
-4-C)
Open the jack cover and connect the plug. (Arrange the cable connected to this unit
in a loop towards the rear of the plug, as illustrated.)
Aer installing the camera into this unit, lightly press the cable to arrange it on the
grip belt side of the camera.
When using HDR-PJ600V/PJ600/PJ50V/PJ50, HDR-XR260V/XR260/XR160 or
HDR-SR8/SR7/SR5 (See illustration
-4-D)
Open the jack cover.
Connect the plug.
Aer installing the camera into this unit, arrange the cable on the grip belt side of
the camera.
When using HDR-XR350V/XR350/XR155/XR150 (See illustration
-4-E)
Open the jack cover and connect the plug.
Aer installing the camera into this unit, arrange the cable on the grip belt side
of the camera, taking care not to catch the cable on the camera mounting shoe or
other parts.
When using HDR-CX12/CX11/CX7/CX6 (See illustration
-4-F)
Open the jack cover.
Connect the plug.
Put the cable on the camera mounting shoe and install the camera into this unit.
Aer installing the camera into this unit, arrange the cable on the grip belt side
of the camera, placing the cable so that it does not fall from the camera mounting
shoe.
When using HDR-CX520V/CX520/CX505V/CX500V/CX500 or DCR-SR85/SR75/
SR65/SR55/SR46/SR45/SR36/SR35 (See illustration
-4-G)
Open the jack cover and connect the plug. (Arrange the cable connected to this unit
in a loop towards the rear of the plug, as illustrated.)
Aer installing the camera into this unit, lightly press the cable to arrange it on the
grip belt side of the camera.
When using the HDR-CX550V/CX550/XR550V/XR550 (See illustration
-4-H)
Open the jack cover.
Connect the plug.
Aer installing the camera into this unit, arrange the cable. (Hook the cable at the
cable holder.)
When using DCR-SR88/SR78/SR68/SR58 (See illustration
-4-I)
Open the jack cover.
Connect the plug.
Clip the cable into the groove of the reex prevention ring as illustrated.
Arrange the cable as illustrated and attach the camera mounting shoe to this unit.
Notes on attachment:
Do not bend the cable.
ˎ
Make sure that the cable has not come o the groove of the reex prevention ring.
ˎ
Aer installing the camera into this unit, make sure that the cable is not interfering
with the lens of the camera.
When using HDR-CX700V/CX700/CX690/CX560V/CX560 (See illustration
-4-J)
Open the jack cover.
Pass the cable under the grip belt of the camera and connect the plug.
Aer installing the camera into this unit, arrange the cable on the grip belt side of
the camera.
When using HDR-PJ590V/PJ580V/PJ580/PJ260V/PJ260/PJ40V/PJ30V/PJ30/
PJ20/PJ10 or HDR-CX590V/CX580V/CX580/CX570/CX360V/CX360
(See illustration
-4-K)
Open the jack cover and connect the plug.
Aer installing the camera into this unit, arrange the cable on the grip belt side of
the camera.
When using HDR-PJ760V/PJ760/PJ740V/PJ720/PJ710V/PJ710 or HDR-CX760V/
CX760/CX740V/CX730/CX720V (See illustration
-4-L)
Open the jack cover.
Connect the plug from the top as illustrated.
Aer installing the camera into this unit, arrange the cable on the grip belt side of
the camera.
5 Close the rear body.
Press the rear body shut and fasten the buckles until they click in place.
Notes
Be careful not to pinch the cables when closing the rear body.
ˎ
Although the center of the lens of some camera models may be out of line with the
ˎ
center of the front glass of this unit when installed, this does not cause any problems
when recording.
台座
Camera mounting shoe
Sabot de montage de caméra
ガイド
Guide
Guide
ボディ
Body
Corps


 (34 pages)
 (2 pages)
 (2 pages)
 Manymanuals.com
 Manymanuals.de
 Manymanuals.fr
 Manymanuals.it
 Manymanuals.pl
 Manymanuals.cz
 Manymanuals.es
 Manymanuals-pt.com
Comments to this Manuals