HT-NT3 4-559-518-23(1)
© 2015 Sony Corporation Printed in Malaysia
GB
FR
AR
PR
4-559-518-23(1)
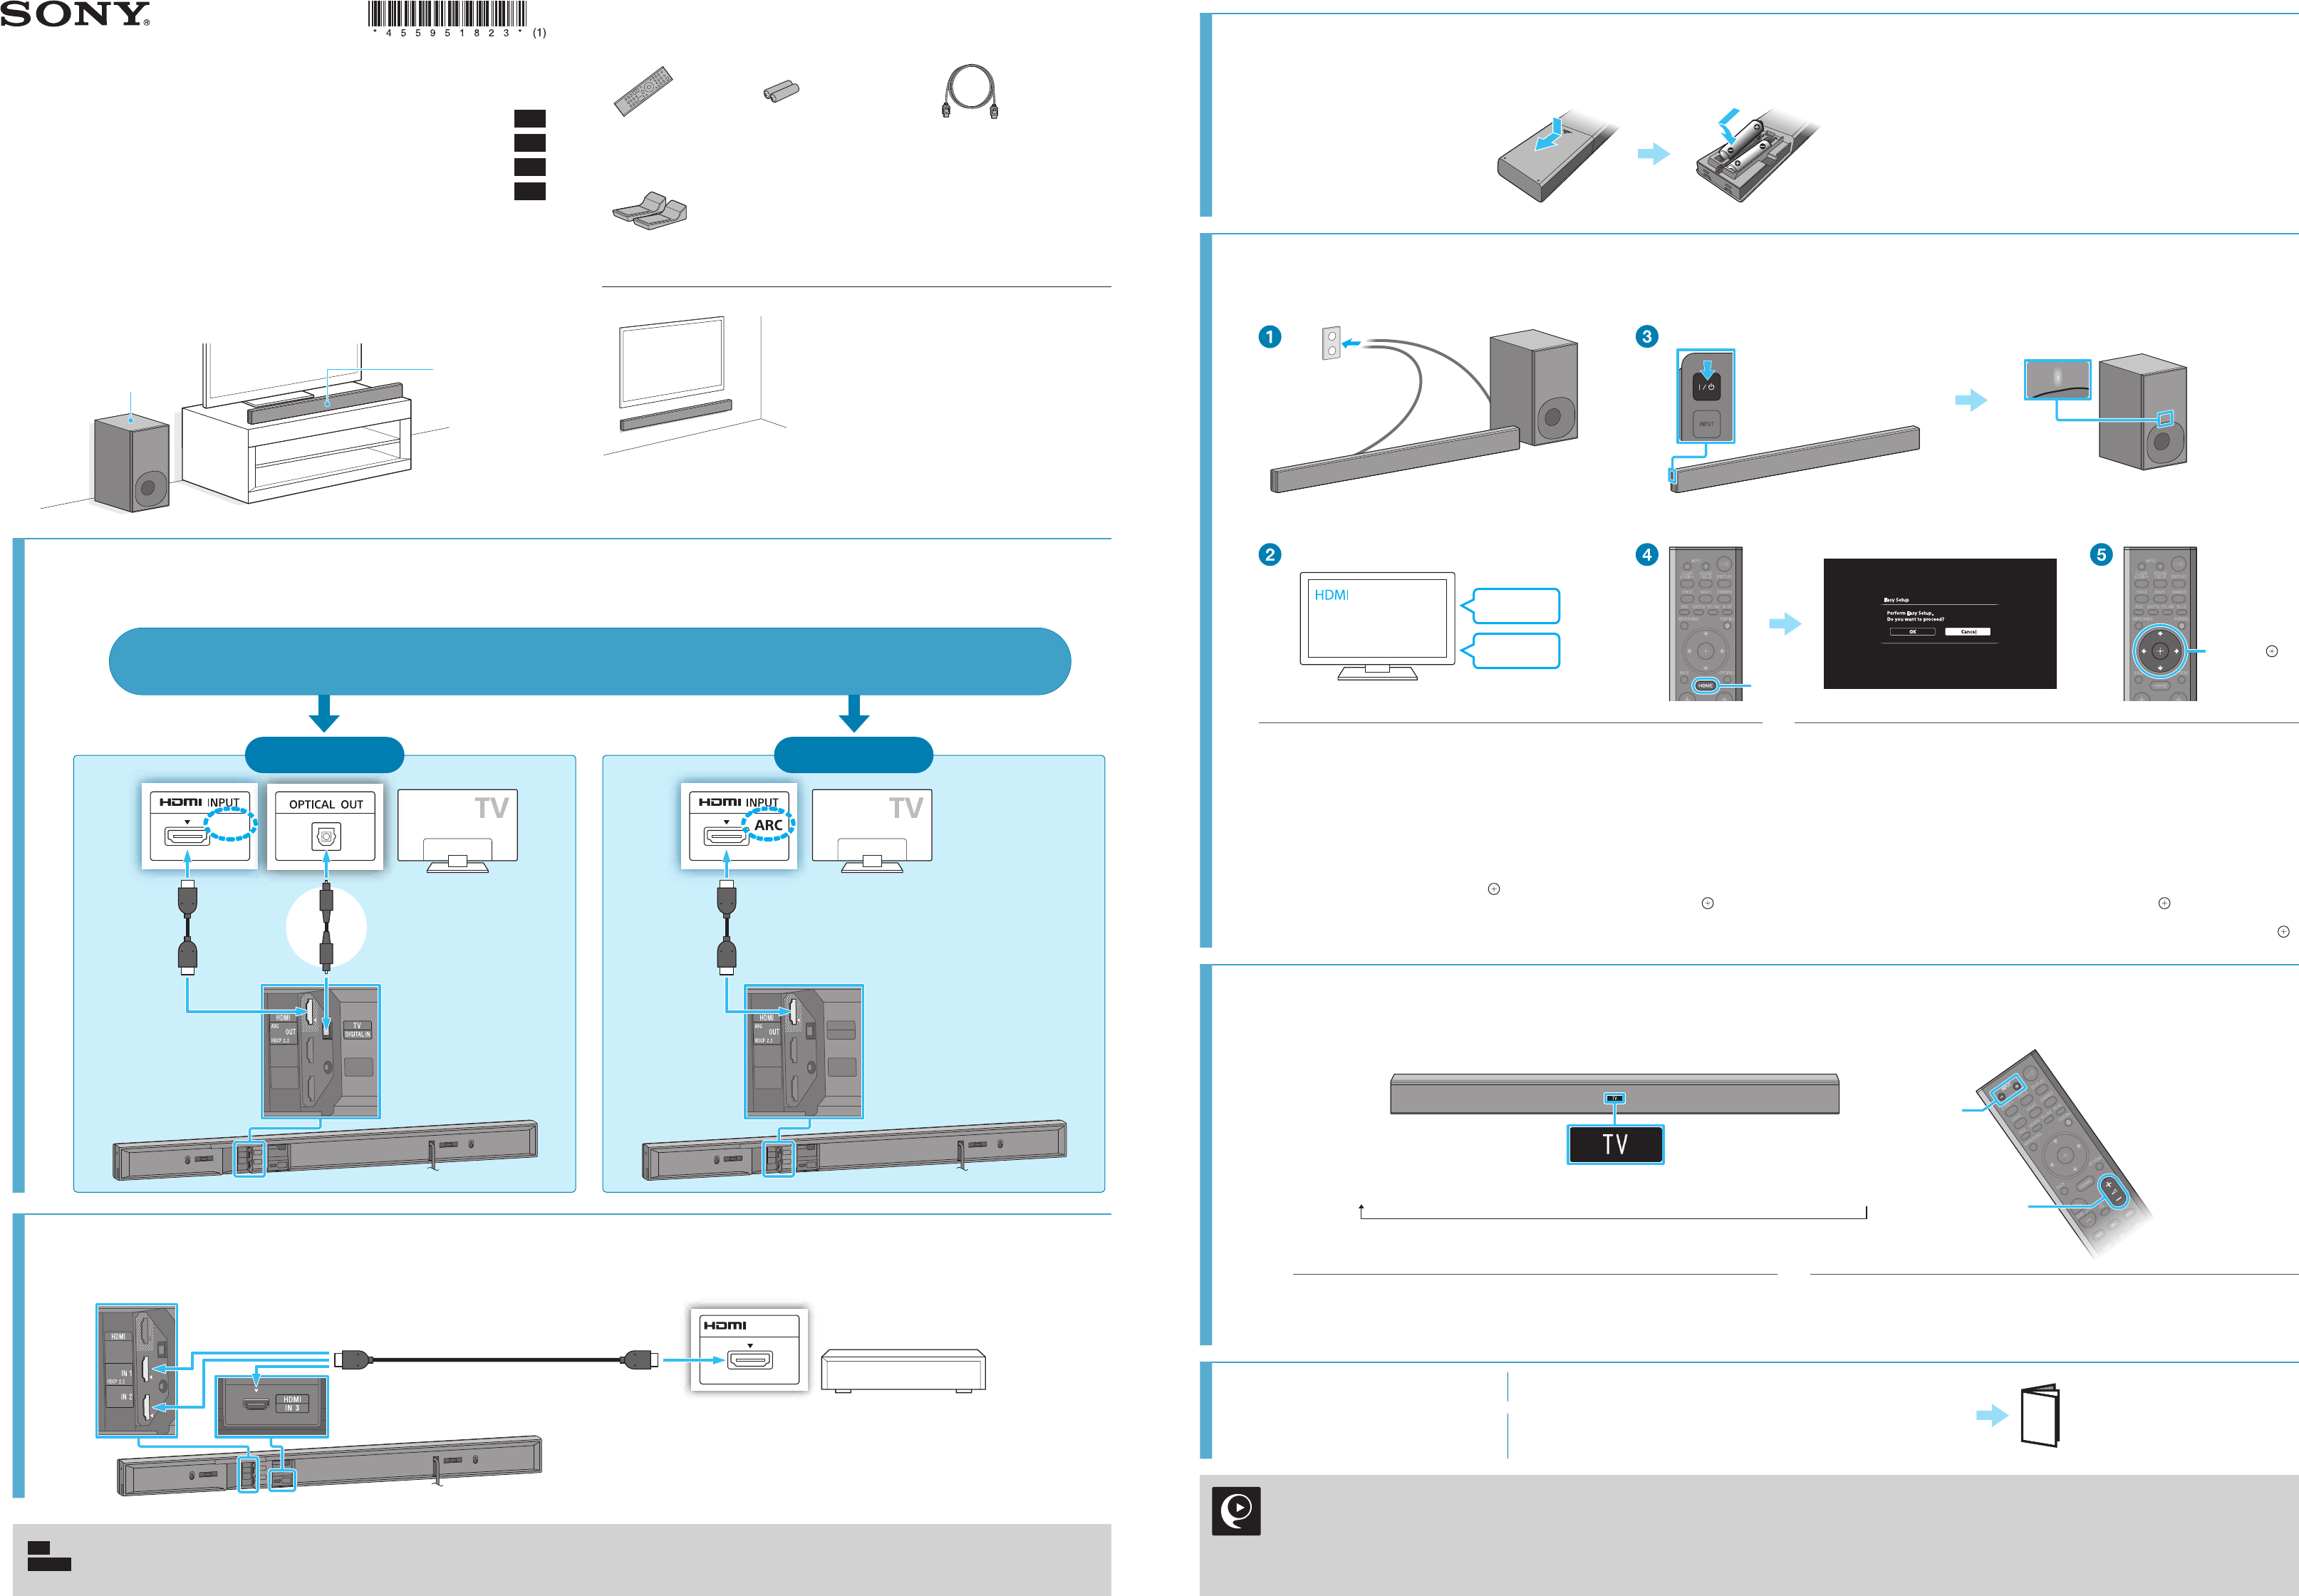
1
Connecting with a TV
Raccordement à un téléviseur
Is the HDMI input jack on your TV labeled “ARC” ?
La prise d’entrée HDMI de votre téléviseur porte-t-elle l’étiquette « ARC » ?
NO/NON
Optical digital cable (not supplied)
Câble optique numérique (non fourni)
High Speed
HDMI Cable
with Ethernet*
(supplied)
Câble HDMI haute
vitesse avec
Ethernet* (fourni)
YES/OUI
High Speed HDMI Cable with Ethernet* (supplied)
Câble HDMI haute vitesse avec Ethernet* (fourni)
* Make sure that the HDMI
cable is firmly inserted.
Assurez-vous que le câble
HDMI est fermement inséré.
* Make sure that the HDMI
cable is firmly inserted.
Assurez-vous que le câble
HDMI est fermement inséré.
2
Connecting with other devices
Raccordement à d’autres appareils
OUTPUT
* Make sure that the HDMI cable is firmly inserted.
Assurez-vous que le câble HDMI est fermement inséré.
High Speed HDMI Cable with Ethernet* (not supplied)
Câble HDMI haute vitesse avec Ethernet* (non fourni)
Blu-ray Disc™ player, cable box or satellite box, etc.
Lecteur Blu-ray Disc™, décodeur de
câblodistribution ou récepteur satellite, etc.
Startup Guide
Guide de démarrage
Sound Bar
HT-NT3
Bar Speaker
Enceinte-barre
Supplied accessories
Accessoires fournis
Remote control (1)
Télécommande (1)
R03 (size AAA) batteries (2)
Piles R03 (format AAA) (2)
High Speed HDMI Cable with
Ethernet (1)
Câble HDMI haute vitesse avec
Ethernet (1)
Stands (2)
Supports (2)
To mount the Bar Speaker on a wall
Refer to the supplied operating instructions.
Pour installer l’enceinte-barre sur un mur
Reportez-vous au mode d’emploi fourni.
3
Setting up the remote control
Configuration de la télécommande
4
Turning on the system
Mise sous tension du système
,
,
,
,
Easy Setup
Perform Easy Setup.
Do you want to proceed?
OK Cancel
HOME
Power
Alimentation
Input
Entrée
Connect the AC power cords (mains leads).
Turn on the TV and then change the input of the TV to the input to which the Bar
Speaker is connected.
Press
(on/standby). The front panel display lights up.
When the on/standby indicator of the subwoofer turns green, wireless connection of Bar
Speaker and subwoofer is completed. If it does not turn on, the wireless transmission is
not activated. Refer to “No sound is heard from the subwoofer.” of “Troubleshooting” in the
supplied operating instructions.
Press HOME after “PLEASE WAIT” disappears from the front panel display.
Press
/
to select [OK], then press to start [Easy Setup].
Follow the on-screen instructions to make the basic settings using
/
/
/
and .
Branchez les cordons d’alimentation secteur.
Allumez le téléviseur et changez l’entrée sur le téléviseur pour choisir celle à
laquelle l’enceinte-barre est connectée.
Appuyez sur
(marche/veille). L’afficheur du panneau avant s’allume.
Lorsque l’indicateur marche/veille du caisson de graves devient vert, la connexion sans fil de
l’enceinte-barre et du caisson de graves est effectuée. S’il ne s’allume pas, la transmission
sans fil n’est pas activée. Reportez-vous à « Aucun son ne se fait entendre du caisson de
graves. » du « Dépannage » dans le mode d’emploi fourni.
Appuyez sur HOME une fois que le message « PLEASE WAIT » a disparu de
l’affichage du panneau avant.
Appuyez sur
/
pour sélectionner [OK], puis appuyez sur pour démarrer [Easy
Setup].
Suivez les instructions à l’écran pour effectuer les réglages de base à l’aide de
/
/
/
et .
5
Enjoying video/sound from the connected devices
Regarder des vidéos et écouter le son diffusés par les appareils raccordés
TV HDMI1 HDMI2 HDMI3 BT ANALOG USB SCR M H.NET M.SERV
INPUT +/–
+/–
Press INPUT +/– repeatedly until the device you want appears in the front panel
display. Then, press
+/– repeatedly to adjust the volume. To listen to TV audio,
select the program you want using the TV remote control.
Appuyez plusieurs fois sur INPUT +/– jusqu’à ce que l’appareil de votre choix
apparaisse sur l’afficheur du panneau avant. Appuyez ensuite plusieurs fois sur
+/– pour régler le volume. Pour écouter le son du téléviseur, sélectionnez le
programme choisi à l’aide de la télécommande du téléviseur.
Setup completed! Enjoy!
Please refer to the supplied operating instructions for details on
the network connection, NFC function, and other functions.
Operating Instructions
Mode d’emploi
Configuration terminée !
Profitez de votre système !
Veuillez vous reporter au mode d’emploi fourni pour plus
d’informations sur la connexion au réseau, la fonction NFC et
d’autres fonctions.
SongPal
A dedicated App for this model is available on both Google Play™ and
App Store.
Search for “SongPal” and download the free App to find out more about the convenient
features.
Une application dédiée pour ce modèle est disponible sur Google Play™
et App Store.
Recherchez « SongPal » et téléchargez l’application gratuite pour en savoir plus sur les
fonctions pratiques.
Subwoofer
Caisson de graves
Tip
To enjoy copyright-protected 4K content, connect the HDCP 2.2-compatible HDMI jack. For details, refer to “Viewing Copyright-protected 4K Content” in the supplied operating instructions.
Conseil
Pour regarder ou écouter des contenus 4K protégés contre la copie, raccordez la prise HDMI compatible avec HDCP 2.2. Pour plus d’informations, reportez-vous à la section « Affichage de contenus 4K protégés contre la copie »
du mode d’emploi fourni.


 (1 pages)

 (2 pages)

 Manymanuals.com
 Manymanuals.de
 Manymanuals.fr
 Manymanuals.it
 Manymanuals.pl
 Manymanuals.cz
 Manymanuals.es
 Manymanuals-pt.com
Comments to this Manuals